Wednesday, 4 July 2018

Oracle Fusion Application : Create Custom ESS Job to run BIP Report


In this post I will list the steps required to create a new custom ESS job to be used to run a BIP report which takes a parameter input.

Assuming that you have already created a BIP report, lets begin!

1. Login to Oracle Application Cloud
2. Navigate to Setup & Maintenance
3. In Search Task, search for 'Enterprise Scheduler Jobs for Financial and Supply Chain Management%'


4. Click on the task
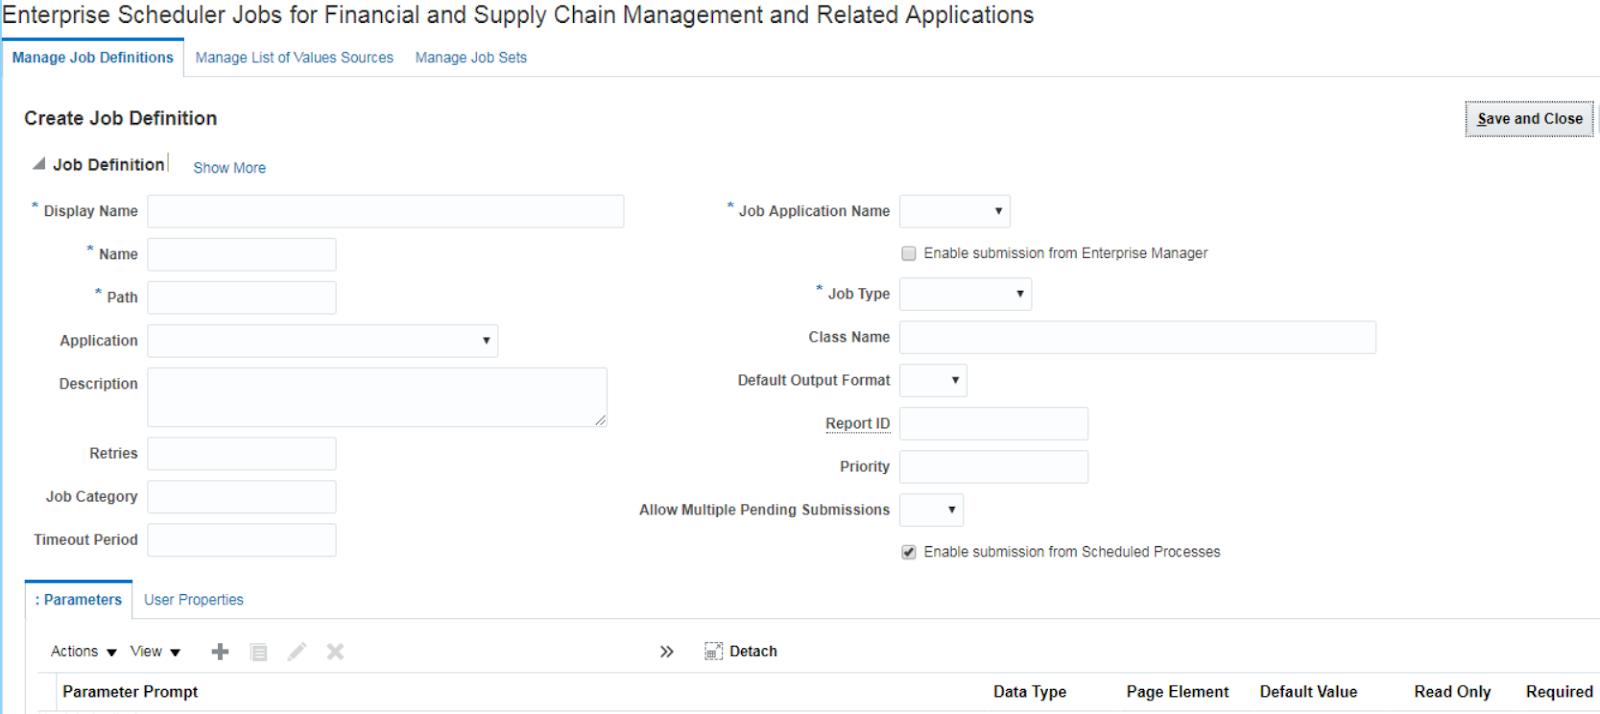
5. On the Manage Job Definition Tab you will see a Action icon like below


6. Click on Action and select Create


7. On the Job Definition page above,  fill the details like below:

Display Name: Test ESS Job [a meaningful name]
Name: Test_ESS_Job [Identifier without spaces]
Path: fscmess/testjobs/ [relative folder which will be created under path /oracle/apps/ess/custom/]
Description: Custom ESS Job
Job Application Name: FscmEss
Enable submission from Enterprise Manager: Unchecked
Job Type: BIPJobType
Bursting report: Checked if you have bursting for your report else Unchecked
Class: (Auto populated)
ReportID: /Custom/Samples/Test BIP Report.xdo [path of your report on BI Catalog]
Allow multiple pending submissions: False
Enable submission from Schedule Process: Checked

8. On the parameter tab below click on Actions > Create
9. Enter the details like below

Parameter Prompt: Identifier
Data Type: String
Read Only: Unchecked
Page Element: Text Box
Default value:
Tool Tip:
Required: Checked
Do not Display: Unchecked

10. Save and Close
11. Done

To submit/run this job:

1. Navigate to Schedule Processes > Schedule New Process > Search (Test Ess Job)
2. Select
3. Enter parameter id and submit.
4. Refresh to view the status of the process.
5. Check your report output in process log.


Helpful?? Please comment

Happy Learning!!

Saturday, 23 June 2018

Oracle ICS : How to use Lookups in integrations - lookupValue function


To use a lookup in your integration, ICS provides a function : lookupValue which is configured with the Build Lookup Function wizard.

You may have already created a lookup on the Lookups page.
On steps how to create a lookup you can follow the blog page: Oracle ICS : How to create Lookups

Below are the steps to access and use a lookup.

1. Build Lookup Function Wizard:
  a. Go to and open your Integration (Edit mode)
  b. Open the Expression Builder (in mapping, assign, filter and other flow actions)


   c. Expand Components   
   d. Expand Functions > ICS
   e. Drag the lookupValue function into your expression box

You can also search for 'lookupValue' in the search box for Components.

The Build Lookup Function Wizard is displayed.

2. Setting up the lookup function:
    a. From the displayed lookups select the lookup you want to use (I have used the same lookup i created earlier)


b.  Click on Next 

The lookupValue function requires a source and target column.
The source column refers to your source value and the function returns the value in the corresponding target column.
If not found it will return the default value(if you define one)

Basic signature:
lookupValue(dvmlocation, srcColumn, srcvalue, targetColumn, defaultValue)

   c. Click on 'Select Source Column' and select the source column
   d. Repeat for Target Column
   e. Lookup definition will then look like below:


   f. Click on Next
   g. Enter a default value example: 'No Value Found' or leave blank
   h. Click on Next

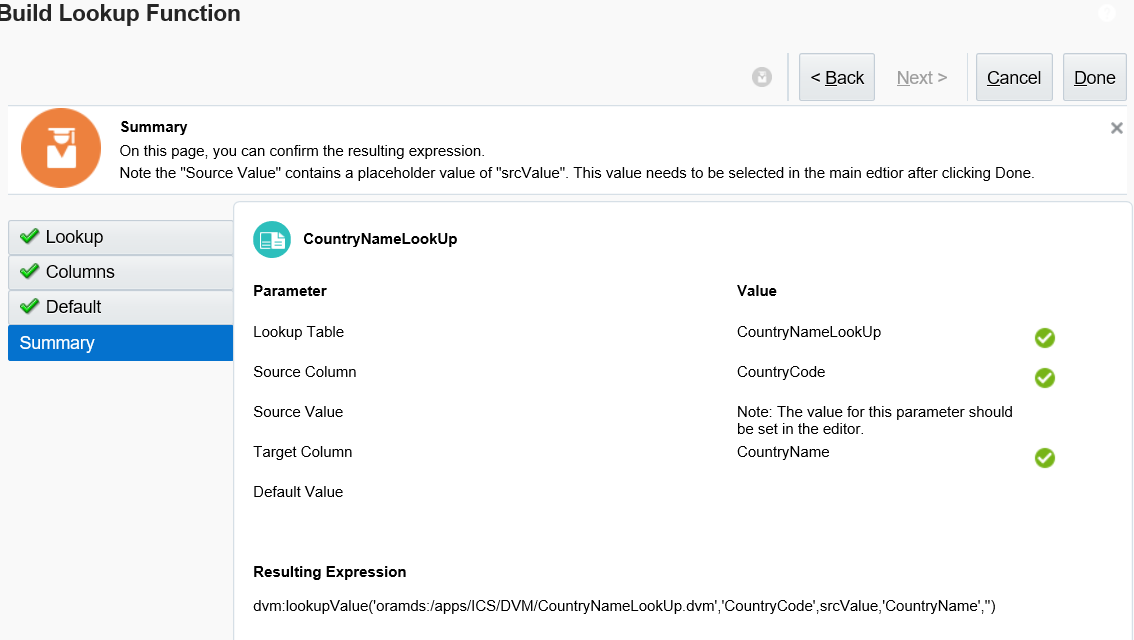
Summary is like below:


   i. Click on Done 
   j. You will see a Warning message because srcValue is not yet set
   k. Click on OK
   l. The expression is like below:

dvm:lookupValue('oramds:/apps/ICS/DVM/CountryNameLookUp.dvm','CountryCode',srcValue,'CountryName','')

  m. Remove the srcValue and map/enter the value you want to use.
  n. If hard coding, enter the value in quotes - example 'IN'

dvm:lookupValue('oramds:/apps/ICS/DVM/CountryNameLookUp.dvm','CountryCode','IN','CountryName','')

 3. Validate and Save.

When you will run your integration the lookup will fetch 'India'.


Helpful? Please Comment.

Happy Learning!!


Oracle ICS : How to create Lookups / Domain Value Map (DVM)


In Oracle ICS lookups are pretty simple and easy to configure and use.
They are also easy to migrate from one environment to another.

Below is a detailed explanation of how to create lookups in Oracle ICS.

1. Login to Integration Cloud Service domain.
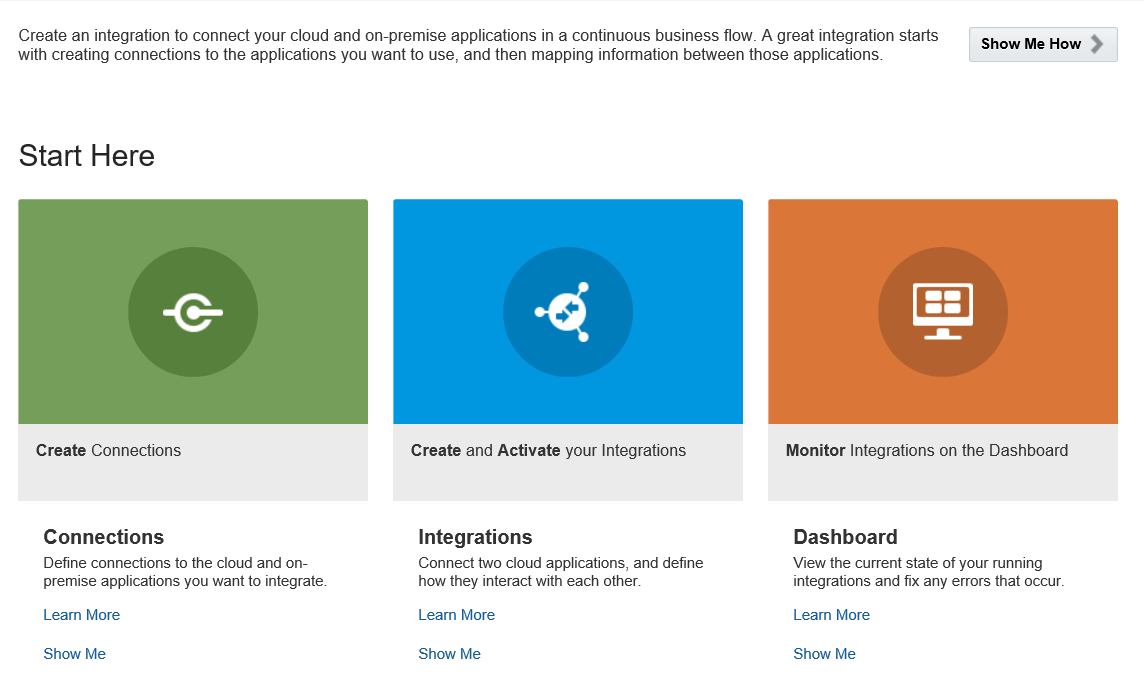
2. On the home page click on the Lookups diagram


3. Click Create on the right top corner.
The create new lookup dialog is deisplayed

4. Enter a Name, an optional Description and click on Create.


5. The lookup page is displayed.
6. Click on the domain name and select Edit Domain Name to change name.


7. Enter a new name and click on OK. (Character limit is 50)


8. Similarly edit other domain name.
9. Add new domain/column by using the '+' on the right hand side.
10. Enter a value in the field below the domain name. To add more rows click on '+' on the bottom.
11. Repeat to add more domain and values to the lookup.
12. Your lookup will look like below:


13. Click Save when complete.


Helpful?? Please Comment

Happy Learning!!

Friday, 22 June 2018

SOA 12c : Export/Import ESS job from one environment to another


In the current version of SOA once you create an ESS job we have to use the below process to migrate it to another environment.


For executing the below we will have to use WSLT.

Steps:
1. Login in to your server
2. Navigate to bin: cd $SOA_HOME/common/bin
3. Run : ./wlst.sh

4. Run: connect('weblogic','password','t3://adminserver_hostname:adminserver_port');
This will connect you to the ESSserver.

5. Run: exportMetadata(application='EssNativeHostingApp', server='ess_server1', toLocation='/home/temp/EssDevExport.zip');

6.importMetadata(application='EssNativeHostingApp', server='ess_server1', fromLocation='/home/temp/EssDevExport.zip');

These steps will export the metadata of your ESS jobs and you can then import the same into another environment.

Helpful?? Please Comment.

Happy Learning!!


Monday, 28 May 2018

Oracle ICS : Import ERP Cloud certificates


One of the pre-requisites to implement callback from ERP cloud to Oracle ICS is importing the ERP cloud certificates into ICS to authenticate SAML assertion from Oracle ERP cloud.

First we will cover how to retrieve the certificates:

1. The ERP cloud certificates can be retrieved from the Catalog Service WSDL URL.
The WSDL URL is like below:

R12: https://hostname/fndAppCoreServices/ServiceCatalogService?WSDL
R12: https://hostname/fscmService/ServiceCatalogService?WSDL

Enter the WSDL URL in your browser. Once loaded, navigate to X509Certificate element like shown below:


2. Copy each certificate string and in notepad make like below:

-----BEGIN CERTIFICATE-----
YIOUMIIDbDCCAlSgAwIBAgIGAVMkh+/kMA0GCSqGSIb3DQEBCwUAMHgxCzAJBgNVBAYTAlVTMRAwDgYDVQQIEwdNe
-----END CERTIFICATE-----

3. Save this file as erp_certificate1.cer
4. Repeat for second certificate line and save as erp_certificate2.cer

Now that we have both certificates we will import them into Oracle ICS

1. Login to Oracle ICS console
2. On the left navigation bar go to Integrations
3. Click on Settings


4. Under Settings select Certificates


5. On upper-right corner click on Upload
6. Select Type: Message Protection Certificate. Enter a valid name and browse and upload your certificate 1


7. Repeat for certificate 2

There done.


Helpful?? Please Comment

Happy Learning!!

Oracle ICS : Create a REST connection


Below are the steps to create REST connection in Oracle ICS to create a REST service or to call a REST service.

1. Login to ICS Console
2. On Home page, click on 'Create Connection'


3. Click on create on upper-right corner


4. Search for REST and select


5. Enter the name - Test_REST_Conn

6.
a. Select Trigger and Invoke if you are going to call another REST URL
b. If you want create a REST integration/service using this connection then only select Trigger option (connection properties will be required to be entered)

Click on create.

7. If using option a, follow below steps or go to step 12

8. Click on 'Configure Connectivity'


9.
a. Select Connection Type: REST API Base URL
b. Connection URL: Enter/Paste the REST service URL


10. If the REST API requires authentication, ex: basic authentication, then click on the 'Configure Security'

11. Select Policy: Basic Authentication, and enter the username and password and click on OK


12. Click Save and Test your connection from the upper-right corner. If the test is successful, the connection status will be 100% and ready to use.


Helpful?? Please Comment

Happy Learning!!

Sunday, 8 April 2018

Oracle ICS : Difference between Orchestration and Map Data Style/Pattern


When you are creating an integration in Integration Cloud there are 4 styles/patterns of integration that you can create. This is in the version 18.1.3.0.0 of Integration Cloud.

In this post, I will explain to you the difference between going with;
   a. Map Data
   b. Orchestration


The other 2 are for ICS to/from integration which I will explain in a different post.

Now, when creating integrations your requirement may vary as to how you want to interact with/between two or more services.

On that note:

a. Map Data: This style is used when you only want to talk between 2 services. Here 2 services mean one which is talking to the source(trigger) and the other which is talking to the target system(invoke).

So either you would be having:

    i. One way exchange:

Ex: Read from a Queue/File/DB/WebService and send to another Queue/File/DB/WebService.
Read the data, transform/filter/enrich it and then send it to the target service. No response required  from target. In this case you have only one map(transformation).

    ii. Synchronous exchange:

Ex: Take input from the source, call a service with that input and get a response back. Enrich/filter/transform the data received and send it to the source.
Here you have 2 mappings: Request and Response.

You will also have a fault map which you can use in case there is any fault in the target service.

Your use depends on the type of service and business requirement you are trying to achieve.

b. Orchestration: Orchestration style is used when you want to invoke multiple services and perform actions(condition/looping/transform/logging/alerting/notifying etc) in between, finally to achieve one business requirement/outcome.

Simple Ex: Read data from a DB table, loop through each record and based on condition write to 2 different files and SFTP them.

In Orchestration style we can achieve a great amount of data processing and application of business rules using the available actions(or activities).

Not all actions which were part of OSB are there presently, but they may be added in future releases.


Helpful?? Please Comment.

Happy Learning!!


Saturday, 7 April 2018

Oracle ICS : Create SOAP connection using WSDL URL


If you are new to ICS and want to create a SOAP WSDL connection, follow the below steps:

1. Login to your Oracle Integration Cloud domain.


2. On the Home page click on 'Create Connections' green box


3. On the 'Connections' page, right-hand corner click on 'Create'


4. On the 'Select Adapter' pop-up, search for SOAP adapter and click on 'Select'


5. You will be directed to the 'Create New Connection' dialog. Fill as below:

  a. Name - Enter a unique name for your connection (Not more than 50 char).
  b. Identifier - (No need to enter) It will be added as you key in the connection name.
  c. Role - Leave default -Trigger & Invoke
  d. Description - Enter a short description if required.


6. Click on Create.


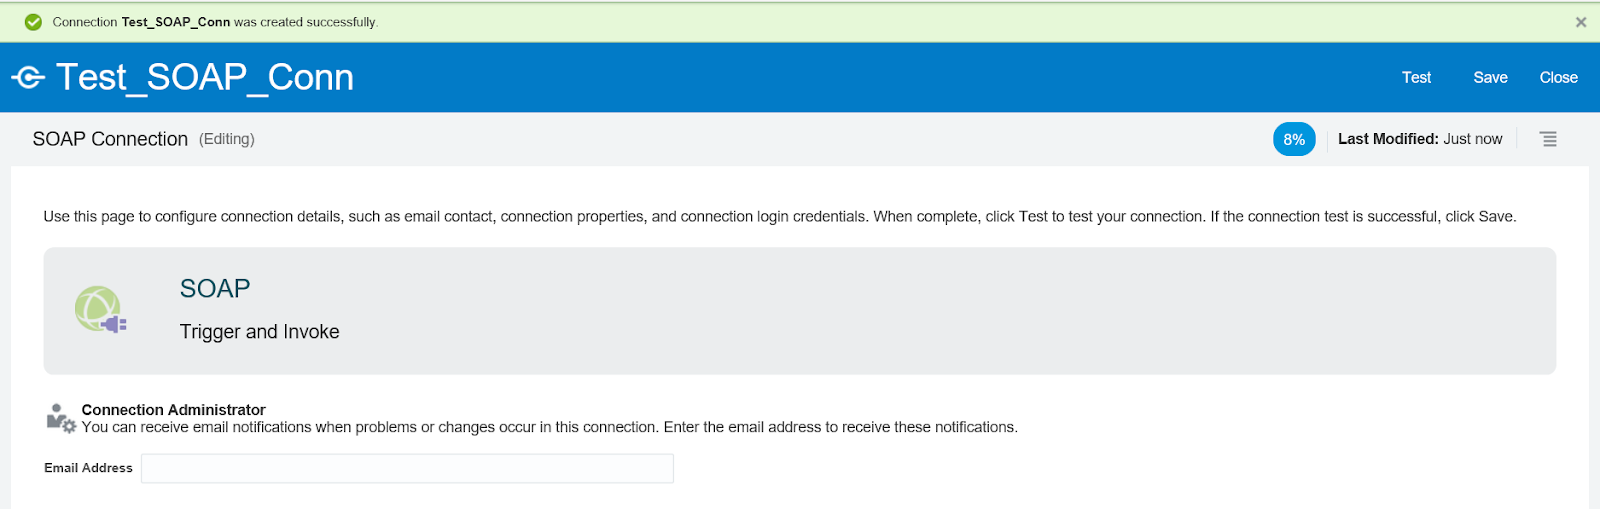
7. A connection is created (with status at 8%). Now we will configure it (to 100%).

8. (Optional) If you to receive notifications when there a change/issue with this connection, you can enter the email address in the 'Email Address' box.

9. Click on 'Configure Connectivity' button on the right side.

10. On the Properties dialog box enter/paste the web-service WSDL URL that you want to invoke.
(Upload is when you are using a abstract WSDL to create your own service)


If the web-service WSDL requires the additional properties mentioned, select the ones necessary.

11. Click on OK
12. Scroll down of the page and click on 'Configure Security'
13. Select the type of security policy* that is required for the service and enter the values as required.

By default, the security is set to 'Username Password Token' type.

  a. Basic Authentication: When service requires username/password only to be called.
  b. Username Password Token: When the service requires username/password as WSS token
  c. No Security
  d. SAML

*You can check the security policy by loading the WSDL in the browser.

14. Done, now Save and then Test your connection.

You can either
  a. Validate and Test (Validates your entire WSDL), or
  b. Test (Syntax validation)


15. Close
16. Your connection is created and configured 100%. It will have a ✅


Done.


Helpful?? Please Comment.

Happy Learning!!


Thursday, 21 December 2017

SOA 12c DBAdapter : Exception occured during invocation of JCA binding: Could not create/access the TopLink Session.

Recently created a new DataSource and adapter JNDI and when trying to test I got the below error:

Exception occurred when binding was invoked. Exception occurred during invocation of JCA binding: “JCA Binding execute of Reference operation ‘merge’ failed due to: Could not create/access the TopLink Session. This session is used to connect to the datastore. Caused by Exception [EclipseLink-7060] (Eclipse Persistence Services – 2.3.1.v20111018-r10243): org.eclipse.persistence.exceptions.ValidationException Exception Description: Cannot acquire data source [jdbc/Demo_DB]. Internal Exception: javax.naming.NameNotFoundException: Unable to resolve ‘jdbc.Demo_DB’. Resolved ‘jdbc’; remaining name ‘DemoDB’. You may need to configure the connection settings in the deployment descriptor (i.e. DbAdapter.rar#META-INF/weblogic-ra.xml) and restart the server. This exception is considered not retriable, likely due to a modelling mistake. “. The invoked JCA adapter raised a resource exception. Please examine the above error message carefully to determine a resolution.


The solution was simple. Either you can;

1. Cross verify the DataSource name in the adapter JNDI connection pool and make sure to update the DBAdapter.

or

2. Check if your DataSource is targeted to the soa_server. If not, target it.


Helpful? Please Comment.

Happy Learning!!

Monday, 11 December 2017

SOA 12c : Error JTA transaction is not in active state/The action "update action" cannot be performed on the instance

Today while I was testing a service I was seeing errors intermittently on EM instances.
My service was invoking a sync partner link and even with successful response the error was  happening.

Well turns out the error was due to the default JTA setting to 30 seconds.

Error:
JTA transaction is not in active state.
bpel engine can not execute activities without an active transaction. please debug the invoked subsystem on why the transaction  is not in active status. the bpel instance id is "448".
The reason was The execution of this instance "448" for process "App/ProjectBPEL!1.0*soa_3cd6576b-91bd-4992-afaf-3620d3509180" is supposed to be in an active jta transaction, the current transaction status is "MARKED_ROLLBACK" .
Consult the system administrator regarding this error.

or

Cannot access instance.
The action "update action" cannot be performed on the instance "9579" because of its current state ("unknown").
The current instance state did not allow the requested action to be performed.
Consult the product documentation for a list of all the permissible actions that can be performed on an instance when it is in the "unknown" state.

Solution:
1. Login to WebLogic console.
2. Navigate to JTA settings
3. Increase your JTA to a higher value.

JTA values can depend on the processing time that your partner may take in a sync exchange set globally.

Helpful? Please Comment.

Happy Learning!!

Thursday, 7 December 2017

SOA 12c : Change BPEL Preference Property at Runtime on EM

Here is what you can do if you want to update your bpel.preference.variable value on 12c Enterprise Manager.

Example, if you have set variable as below in your composite.xml:

<property name="bpel.preference.Email">test@test.com</property>
  
1. Login to EM [http://hostname:port/em]
2. On Left Navigator, navigate to WebLogic Domain > soa_domain


3. Right-click and select 'System MBean Browser'
4. On next page, left pane scroll at the bottom and expand oracle.soa.config
5. Navigate under that to Server: soa_server > SCAComposite > Your composite[version]
6. Expand and select SCAComposite.SCAComponent > Click on your component
7. On the left pane, under Attributes column click on Properties
8. Under Key expand Element for Email and change the contents of value field.
9. Apply.

The new values should now reflect.

Helpful?  Please Comment.

Happy Learning!!

OSB 12c : Dynamic Routing to Business/Proxy Service

Dynamic routing is a kind of  Content-based Routing pattern, which is used when the BusinessService/ProxyService path is required to be de...