Wednesday 26 February 2020

OSB 12c : Dynamic Routing to Business/Proxy Service


Dynamic routing is a kind of  Content-based Routing pattern, which is used when the BusinessService/ProxyService path is required to be determined at run time, an alternative to Static Routing, which is used when the BusinessService/ProxyService path is established during design time.

As for example, if there are different services eg. BusinessService1, BusinessService2, ProxyService1 that are each based on the same interface, we can use dynamic routing.

The core of this feature is built on the following XML element:

<ctx:route>
<ctx:service isProxy=”true|false”>{$proxy|$businessService}</ctx:service>
<!– Optional : –>
<ctx:operation>{$operationName}</ctx:operation>
</ctx:route>


The isProxy is true or false according to whether the dynamic route is to a Proxy Service or to a Business Service respectively.

Operation is an optional element and is used when you want to invoke a particular operation of a multi-operation ProxyService.

Note: The text inside the Expression tab is a string literal. Any XQuery expressions must be wrapped by braces {}.

The above element in the expression of a dynamic routing action inside a route node, etc. looks like this when executed:

BS:
<ctx:route>
<ctx:service isProxy="false">ServiceCalloutTest/BusinessService1</ctx:service>
</ctx:route>

PS:
<ctx:route>
<ctx:service isProxy="true">ServiceCalloutTest/ProxyService1</ctx:service>
<ctx:operation>initiate</ctx:operation>
</ctx:route>

Now say based on some field element in the input or some variable value you fetch within your pipeline you want to route to a BS or a PS.

Your element variable assume here is alias which can have values say US, IND at runtime based on which you route to the service.

We will create RoutingTable variable on that basis like below using an assign activity.

<Services>
<Service>
<alias>US</alias>
<physical>ServiceCalloutTest/BusinessService1</physical>
</Service>
<Service>
<alias>IND</alias>
<physical>ServiceCalloutTest/BusinessService2</physical>
</Service>
</Services>


So finally in your Dynamic Routing activity below is the expression:

<ctx:route>
<ctx:service isProxy='false'>{$RoutingTable/Service[alias/text()=$alias]/physical/text()} </ctx:service>
</ctx:route>

In the request pipleline you can add activities for process the body/header etc based on what you need to send to the endpoint service


Save and activate your service and Test to verify if working as expected.


Helpful? Comment

Happy Learning.


OSB 12c : Create & Configure Work Manager, Max, Min Thread Constraints

Firstly a little bit of theory. Its important you understand the concept of WM (and its as per Oracle documentation).

WebLogic Server uses a self-tuning thread pool for executing all application-related work. The pool size is managed by an increment manger which adds or removes threads to the pool when it deems it necessary.
The number of active threads will never exceed 400. 
As requests enter the server, a scheduler manages the order in which the requests are executed. When the number of requests exceeds the number of available threads, they are queued and then executed as threads return to the pool and become available. 
Work Managers indicate the type of work and priority of a request to the scheduler.

The following concepts are important to consider when assigning Work Managers to services.

1. Request and response pipelines always execute in separate threads. While the request thread originates from the proxy service transport, the response thread originates from the business service transport.

2. When external services are invoked, threads can be blocking or non-blocking, depending on the pipeline action, the Quality of Service (QoS) configuration, and the transport being used.

3. When using blocking calls, a Work Manager with a minimum thread constraint must be associated with the response in order to prevent server deadlocks.

Two key properties when configuring a Work Manager are Max Thread Constraints and Min Thread Constraints.
A maximum thread constraint limits the number of concurrent threads executing a type of request by restricting the scheduler from executing more than the configured number at one time. However, the thread pool is shared among all Work Managers, so there is no guarantee the maximum number of threads will be available for processing at any given time.

A minimum thread constraint guarantees a minimum number of threads for processing. If sufficient threads are not available in the thread pool to process up to the minimum number, the scheduler uses standby threads to satisfy the minimum. Standby threads are not counted as part of the maximum number of 400 threads in the pool. When a thread is executing a request associated with a Work Manager containing a minimum thread constraint, the Work Manager first checks the queue for another request associated with the same constraint and executes it (instead of returning to the free pool). For this reason, use minimum thread constraints judiciously. Over-use can cause resource starvation of the default Work Manager, leading to unpredictable results.

The Work Manager (dispatch policy) configuration for a business service should depend on how the business service is invoked.
If a proxy service invokes the business service using a service callout, a publish action, or routing with exactly-once QoS, consider using different Work Managers for the proxy service and the business service instead of using the same for both. For the business service Work Manager, configure the Min Thread Constraint property to a small number (1-3) to guarantee an available thread.

Now after all the theoretical details we will see how we can configure work manager in OSB 12c. The concept is similar to that of 11g however the screens have changed for OSB applications.

1. Login to Admin Console : http://host:port/console
2. Click on Lock & Edit
3. Navigate to Environments > Work Managers


4. Create New


5. Select Maximum/Minimum Thread Constraint (which ever you want to create)


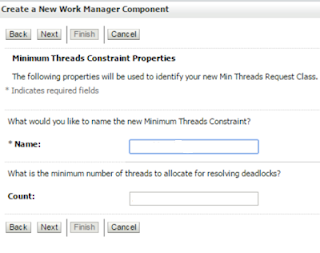
6. Provide Logical Name and Count - say MaxThread4 and 4


7. Click on Next 
8. Choose the target server
9. Finish

Now again click on New 


1. Select Work Manager
2. Provide a Logical Name


3. Click Next
4. For Max and Min Threads Constraint from the drop-down select the ones you have created above
5. Finish and your WM is created with the constraints

Now assigning the WM to your service
1. Login to Service Bus console
2. Create Session
3. Navigate to your Proxy or Business Service
4. Under Transport Details Tab > from drop-down select your WM you have created.
5. Save and then Activate your session 

Helpful? Comment

Happy Learning!

Thursday 20 February 2020

OSB 12c : Message Throttling for a Business Service

Why? - To control the flow of messages to a business service and prevent delays, you can enable and configure message throttling or throttling for business services in your Service Bus applications.

What? - When you use throttling to control message flow, a throttling queue is created, in which messages are queued when a business service reaches its maximum concurrency or when a group limitation reaches its maximum competition. Messages with the same priority are processed on a first-in-first-out basis.
The Throttling Queue is a queue in memory. Once a message has been in the Throttling Queue for an interval greater than the message expiration value configured for the business service, it becomes an expired message and is removed from the queue. When you delete or rename a business service, all messages in the throttling queue are deleted.
When you enable or disable Throttling, as well as the configuration of throttling properties, in the Properties tab of the home page of the business service in Fusion Middleware Control, all the modifications that you apply on this page take effect immediately.

How? - When Throttling is enabled, message flow is restricted to endpoints and messages are processed by priority. You can optionally prioritize messages using the routing options; otherwise, messages are deleted using the first in, first out method.

To configure the limitation for a business service:
1. In the Target Navigation panel of the Fusion Middleware Control, extend SOA > service-bus and click on the name of the project that contains the business service to configure.

2. The Service Bus Project home page appears, click on Properties

3. Check the Throttling State enabled checkbox :


4. Enter the following information:
Maximum Concurrency : The maximum number of records that the business service can process simultaneously. This value cannot be 0 (zero); it must be a positive integer.
Throttling Queue : The maximum number of messages in the Throttling Queue. A value of 0 indicates that there is no Throttling Queue.
Message Expiration : The number of milliseconds that a message can be in the queue before expiration. A value of 0 means that messages do not expire.

To deactivate the limitation for a business service, simply un-check the Throttling State box :


Helpful? Comment.

Happy Learning!

Oracle ICS/OIC/AIC : ERP Callback implementation

Why? - Bulk import(FBDI) in Oracle ERP Cloud integration service is a long running process that require asynchronous callback pattern to notify user/error handling upon job completion.

Where? - ERP Cloud integration services provides infrastructure for user to register their callback service that could be invoked from Or acle ERP Cloud when import job is completed.

What? - The ERP callback returns the status of the bulk process including all the sub processes executed implicitly. It includes the log and error files (compressed in a ZIP format) of each sub processes and the original data file.

When? - The callback web service endpoint URL is registered when invoking importBulkData or exportBulkData operations from ERP Integration services. ERP Cloud will invoke this service upon job competition respectively.

How? - To implement  the call-back capability of the ERP Cloud adapter there are two basic steps/things that you have to do.

1. Import the ERP Cloud certificates.
2. Configure the ERP Cloud Adapter.

For the first part, you can follow the steps mentioned in post oracle-ics-import-erp-cloud-certificates

For step 2, do the following:

Create your ERP Callback integration flow (Say identifier is CALLBACK)
a. Create new integration using orchestration pattern (app driven)
b. In your integration flow, select ERP adapter and configure as follows:


c. Below design to download the log file associated with the ERP process


d. Activate callback and use this callback integration flow in your import integration flow as shown below #c


In your main integration:
a. Drag and add the ERP connection that you have created
b. Enter the name  and on Request page configure the operation you need to perform.


c. On the  Response page enter you call back integration identifier and version


d. Activate both the integrations and enable tracking to view the response payload.
The integration should automatically download the callback file which contains the logs, error and original data files.

Helpful? Comment.

Happy Learning!


Sunday 14 October 2018

SOA 12c : Shell Script to set Environment variables

This is what you you should do if you want to use a shell script to set your environment variable.

1. Create a .sh file ex: setEnv.sh
2. Edit and add like below:

#!/bin/sh

#*****************************************************************************
# This script is used to set up your environment for development with WebLogic
# Server.  It sets the following variables:
#
# JAVA_HOME    - Location of the version of Java
# ANT_HOME     - Location of the version of ANT
#*****************************************************************************

JAVA_HOME="/jdk/jdk1.8.0_131"
ANT_HOME="/oracle_common/modules/org.apache.ant_1.9.2"

export JAVA_HOME ANT_HOME
echo "Your environment has been set."


3. Edit paths based on you machine/environment.
4. Save
5. Execute the script using the command . ./setEnv.sh

6. Validate by executing the command echo $JAVA_HOME

You can add other variables as required.


Helpful? Please comment.

Happy Learning!!

SOA 12c RESTAdapter : Creating a REST Binding


In Oracle SOA Suite 12c we have the much awaited REST adapter, which allows easily integrate REST into your services for XML, JSON or URL-encoded payload.

This is what you should do if you want to expose your service using a REST binding.

We will create a REST POST web-service which  will receive either XML, JSON or URL-encoded parameters and pass them to the BPEL.

Steps:

1. Create new SOA Application and Project
2. Create/Import your schema/XSD file
 If you want to create a schema from scratch, on the 'New Gallery' choose the 'XML Schema'

3. Next we drag a REST Adapter from the Components Palette into the Exposed Services column at the composite.xml, this will bring up the 'Create REST Binding' wizard


Next

4.  At the 'Operation Bindings' section, click on the 'green plus sign' and then click on  'Add operation binding', this will bring up the 'REST Operation Binding' wizard:


5. Provide an Operation Name, define your HTTP verb as POST


6. At the 'Request' tab you will see the options offered for payload: XML, JSON, URL-Encoded and No Payload. Select all except 'No Payload'

7. At the Schema URL field available, we will click on that one’s search icon and select the  'Input' element on the XSD.


8. Click on the 'Generate Sample Payload' button to create sample input payloads.

9. Repeat steps 6 and 7 for 'Response' tab.

10. Click OK to create the operation and OK again on the 'Create REST binding' wizard.

11. Create a Synchronous BPEL process, drag a BPEL component to the composite.xml screen.

12. On the creation wizard, at the Input/Output section, select our XSD element for both and uncheck 'Expose as a SOAP Service'

13. Your  composite should look like below


14. Connect your BPEL and Adapter.
15. In your BPEL add Assign activity and map Input to Output variables.
16. Save all.
17. Deploy and Test.


Helpful? Please comment.

Happy Learning!!


OSB 12c : Dynamic Routing to Business/Proxy Service

Dynamic routing is a kind of  Content-based Routing pattern, which is used when the BusinessService/ProxyService path is required to be de...