In this post I will list the steps required to create a new custom ESS job to be used to run a BIP report which takes a parameter input.
Assuming that you have already created a BIP report, lets begin!
1. Login to Oracle Application Cloud
2. Navigate to Setup & Maintenance
3. In Search Task, search for 'Enterprise Scheduler Jobs for Financial and Supply Chain Management%'

4. Click on the task
5. On the Manage Job Definition Tab you will see a Action icon like below

6. Click on Action and select Create

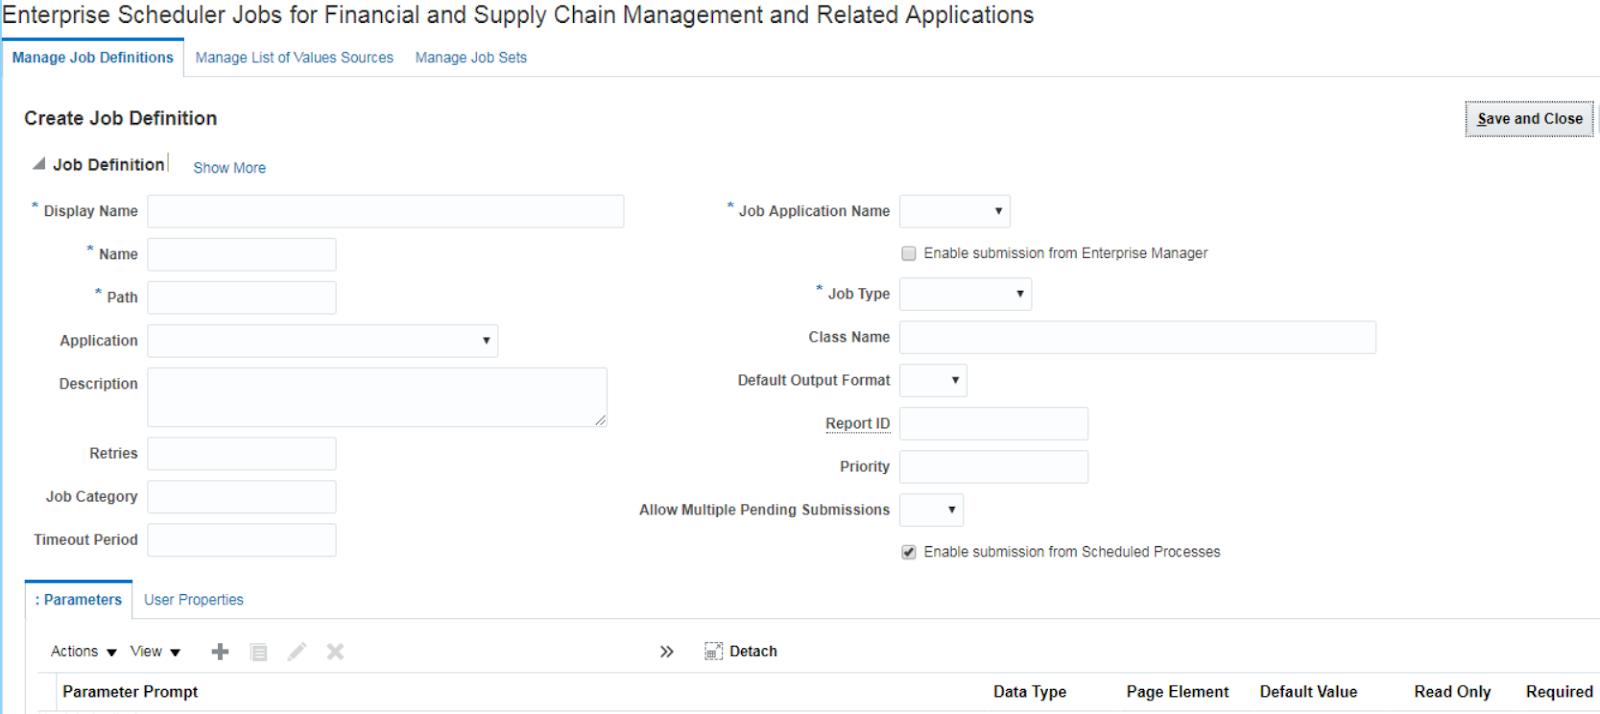
7. On the Job Definition page above, fill the details like below:
Display Name: Test ESS Job [a meaningful name]
Name: Test_ESS_Job [Identifier without spaces]
Path: fscmess/testjobs/ [relative folder which will be created under path /oracle/apps/ess/custom/]
Description: Custom ESS Job
Job Application Name: FscmEss
Enable submission from Enterprise Manager: Unchecked
Job Type: BIPJobType
Bursting report: Checked if you have bursting for your report else Unchecked
Class: (Auto populated)
ReportID: /Custom/Samples/Test BIP Report.xdo [path of your report on BI Catalog]
Allow multiple pending submissions: False
Enable submission from Schedule Process: Checked
8. On the parameter tab below click on Actions > Create
9. Enter the details like below
Parameter Prompt: Identifier
Data Type: String
Read Only: Unchecked
Page Element: Text Box
Default value:
Tool Tip:
Required: Checked
Do not Display: Unchecked
10. Save and Close
11. Done
To submit/run this job:
1. Navigate to Schedule Processes > Schedule New Process > Search (Test Ess Job)
2. Select
3. Enter parameter id and submit.
4. Refresh to view the status of the process.
5. Check your report output in process log.
Helpful?? Please comment
Happy Learning!!
Assuming that you have already created a BIP report, lets begin!
1. Login to Oracle Application Cloud
2. Navigate to Setup & Maintenance
3. In Search Task, search for 'Enterprise Scheduler Jobs for Financial and Supply Chain Management%'

4. Click on the task
5. On the Manage Job Definition Tab you will see a Action icon like below

6. Click on Action and select Create
7. On the Job Definition page above, fill the details like below:
Display Name: Test ESS Job [a meaningful name]
Name: Test_ESS_Job [Identifier without spaces]
Path: fscmess/testjobs/ [relative folder which will be created under path /oracle/apps/ess/custom/]
Description: Custom ESS Job
Job Application Name: FscmEss
Enable submission from Enterprise Manager: Unchecked
Job Type: BIPJobType
Bursting report: Checked if you have bursting for your report else Unchecked
Class: (Auto populated)
ReportID: /Custom/Samples/Test BIP Report.xdo [path of your report on BI Catalog]
Allow multiple pending submissions: False
Enable submission from Schedule Process: Checked
8. On the parameter tab below click on Actions > Create
9. Enter the details like below
Parameter Prompt: Identifier
Data Type: String
Read Only: Unchecked
Page Element: Text Box
Default value:
Tool Tip:
Required: Checked
Do not Display: Unchecked
10. Save and Close
11. Done
To submit/run this job:
1. Navigate to Schedule Processes > Schedule New Process > Search (Test Ess Job)
2. Select
3. Enter parameter id and submit.
4. Refresh to view the status of the process.
5. Check your report output in process log.
Helpful?? Please comment
Happy Learning!!